Occasionally I post pictures of sci-fi modelling on this blog, which I presume to be of interest to at best one or two readers. If it's not your bag, please avert your eyes now.
Anyway, for those still with me, the Zero X!
This splendidly impractical spacecraft appeared in Thunderbirds Are Go, the 1966 film which was both the first Thunderbirds film and the first full-length feature from Gerry Anderson's studio. The film was a terrible flop, but it's fondly remembered by many, and I count myself in that number. Although I hadn't seen much of the original TV series (it was rarely shown on the ITV regions where we used to live) I had the toys and annuals, so I was well acquainted with the characters and vehicles. The film came onto television in the mid-seventies, which is when I first saw it, and I certainly found it entertaining. Granted, the plot is a bit rubbish, with the Tracy brothers having almost nothing to do until the last quarter of an hour of the film, and there's a charming but dull dream interlude in the middle, but the Barry Gray music is top notch and the effects and sets still look brilliant.
The main star of the show is the Zero X ship, of which two prototypes are shown, both ending in disaster! The first one crashes into the sea shortly after take-off (cheers, The Hood), and the second one takes out an entire city after coming back from Mars with a malfunction that wasn't even The Hood's fault! Great stuff! I think it says a lot about the genius of Derek Meddings, the effects supervisor, that his designs still look exciting and futuristic nearly sixty years on.
The film had such an effect on me that I immediately wanted to make a Lego model of the Zero X and crash it into stuff over and over again. However, in the absence of video recorders and pause buttons, all I could do was attempt to remember what it looked like after the film had finished.
I drew a felt-tip pen sketch of it from memory:

Could be worse, but it's not right in all sorts of details. However, luck was in as some while later I was able to borrow a friend's TV21 annual and there was a photo of the Zero X I could copy at my leisure:

Not too bad given the alternatives, I feel. I did build the Lego ones, and enjoyed smashing them into things, but there was still an itch that needed scratching...
Fast-forward 45 odd years, the felt-tip pens have long since dried up, but I still wanted a Zero X. Yes, some things just won't be denied. Although the design has proven popular with Japanese toy and model makers over the years, the options are still a bit limited. From what I could gather, the two most accessible routes to a Zero X were a ready-made die-cast model made by Aoshima, or a very small plastic kit made by Imai. There have also been one or two battery-operated toys from the sixties which seem to be more on the "toy" end of the spectrum, with enormous Monster Truck wheels, and maybe one other 1960s or early 70s kit long out of production which might just be a figment of my imagination. The only other option that I could see, besides scratchbuilding, was a fairly pricey offering from the 1990s that made into a 25-26 inch long model, also made by Imai, and advertised as a resin kit.
I dithered over this for about a year before deciding to take a punt on it, but it was with a measure of uncertainty as I couldn't get a very clear idea of what the components were like, how it fitted together, or what it would look like when finished. No one on the internet seemed to have made one either. However, I felt that neither the Aoshima model nor the small Imai one would give me the "big" Zero X kick I needed.
Here's what the Imai box looked like when it arrived:

It was a tatty box but the parts and decals were all in perfect condition and nothing was missing, broken or distorted in any way. For a kit made about 30 years ago, that's good news.
The first shock was how simple the kit was. There were so few parts that I could just about build the thing there and then while boiling the kettle. In fact all I did for this picture was place the pieces together, with no glue involved at any point:

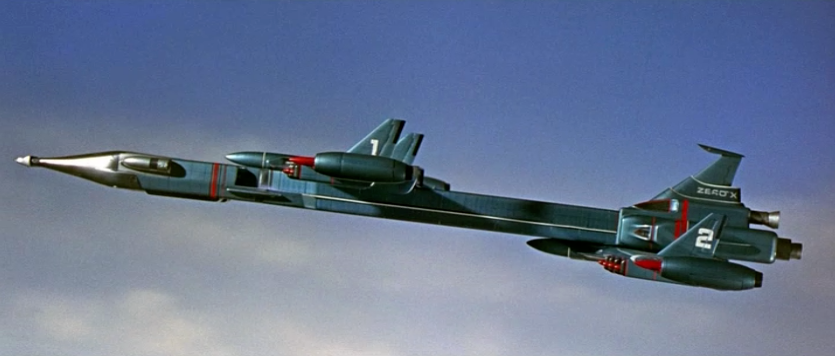
The second observation was that the kit was designed to be made into a one-piece model, with no provision for any detachable bits. In the film, in a triumph of Derek Meddings' effects work, the Zero X is assembled on the apron before taking off, and then various bits come off it during flight, before reattaching as it comes back to Earth. The kit doesn't allow for the Mars Excursion Vehicle to come off, nor the streamlined nose-cone, and the wings are clearly designed to be glued permanently in place. That's fine for a Zero X flying through the atmosphere, as in the shot at the top of this page, but it misses a lot of the bonkers fun of the original concept. I therefore decided that I would try and modify my kit to make the bits fully (if not easily) detachable. This turned out to be no simple job...
First things first, though and I decided to tackle the tail as a starting point, then work forward.

The tail consisted of just four very simple parts. A great deal of model filler had to be used to smooth out the joints between the components. There was very little detail of any kind on the castings, so I scribed in some extra lines using film stills as a rough guide, but not being too critical about it. One thing that helps in this regard is that there were two filming miniatures used, and they don't quite agree in a number of details. I took the view that so long as my Zero X didn't look terribly different from either of these models, it would be fine enough for my purposes.
Now, the kit was described as resin, but once I'd got a good look at it, I began to think it was actually made from some kind of very high density polystyrene foam. The parts are all solid, but once I sanded off the grey top layer (some kind of primer, I think) then a cellular structure began to show through, just like sheets of insulation foam. In terms of detail, I also opened out the air-intakes and added some extra refinement using plastic sheet around the openings. I later discovered some metal castings in the box that probably would have been fine if I'd used them.
The next step was to mate the tail section to the boxy main fuselage:

Soo far so good, but a big problem was about to rear its head. In the meantime, I'd filled, sanded and re-inscribed much of the panel detail on the fuselage part. This was a waste of time as it would all need to be done again because of the lurking problem - it pays to think ahead!
Here's the snag:

Just to the left of the leftmost hole in the top, the fuselage widens out to a different profile. Unfortunately, this is totally wrong. On the filming model, the profile is a constant boxy form until it widens out just before the bit that tucks in near the front:

Although the wrong bit is mostly concealed under the forward wing, and therefore doesn't look too jarring with the wing on, I felt it was worth correcting. By this point, I'd reasoned that I was only ever going to make one of these, so I might as well do as good a job on it as possible, within a reasonable span of time.
The way to solve the profile problem was to file the solid moulding back to the right shape along its length, but this - while simple in principle - turned out to be immensely tedious and time-consuming, and it took many, many goes before I got the profile where I wanted it to be. Once that was done, all the panel detail had be marked out and carefully re-inscribed.
I could then move onto some other issues. The first point of business was to arrange for the wings to be detachable. I sunk small nuts into the body, one for each wing, enabling the wings to be screwed on and off from above and below. I also milled a wide groove into the model at the narrowest point, where I wanted to insert some embossed plastic sheet to improve the detailing.


That addressed, it was time to deal with the two bits that should come off at the front, the Martian Excursion Vehicle (MEV) and the nose-cone.
Two problems here: the first is that the front of the MEV isn't modelled at all in the kit; there's just a stubby bit of material which is meant to disappear once the heavy nose-cone casting is fixed in place. Secondly, the nose-cone needs to be made hollow so that it can slip over the MEV as in the film.
The first job was mark off the point where the MEV attaches to the main fuselage, and - deep breath - saw through in order to separate one bit of the casting from another. This was done very carefully using a hacksaw, as a mistake at this point could in principle have scuppered the whole model. All went well, though, and once I'd made the cut, I tidied it up by gluing and trimming a sheet of plastic to the rear part to provide a nice smooth mating surface.

In order to allow the two parts to be rejoined, I followed a similar approach to the wings. Two small nuts were embedded in the back of the MEV, and then a pair of screws could be fed through from the narrow bit, where there are two rocket exhausts on the studio model. We've jumped ahead slightly here, by the way, as the MEV has also had a scratchbuilt front added to it.

Incidentally, I can't help wondering if this joining method is the very reason for that narrowed bit on the fuselage. The studio model must have needed a means of easily attaching and detaching the MEV, and putting screws through the rocket exhausts seems like a reasonable approach. However, in order to get a screwdriver roughly in line with the screws, there needs to be a bit where the hull tapers in, just as it does on the model.
The front of the MEV needed to be built up from plastic card. using photos as a reference. I eyeballed the various angles and slopes and while they might not be quite right, I think they're acceptable in context. Once I was satisfied with the basic shape, after a lot of filling and sanding, I marked off the window positions (the ones I could see) and drilled them out, followed by much careful dressing with files.

This was my main reference shot for the MEV, shown during the bit where it attaches onto the main ship.

It was then time to deal with the nosecone. This turned out to be not too bad a job as the plastic/resin stuff was quite strong even when a lot of it had been milled out. It was a very laborious job, though, which involved hours and hours of test-fitting. In this shot, I've begun clearing out the necessary space inside the cone but there was a lot more to go.

The next problem to be faced was how to get the nosecone to fit on and off easily without resorting to screws. In the end I embedded a magnet in the cockpit roof of the MEV, and a piece of steel plate in the top bit of the cone. This worked far better than I'd anticipated and the cone snaps in and out of position very satisfyingly even though it's still extremely heavy. The model can be tilted into a near vertical dive before gravity overcomes the strength of the magnet, so it's fine for just displaying.
General tidying-up and detailing took place on all the parts, and then I was ready to begin painting. My first thought was to use some metallic blue paint I'd bought years ago to touch up a scratch on my Telecaster. I'd only gone a little way with this, though, before it immediately became clear that it was much too dark. The film models look different in various shots but never quite as dark as mine was heading, so I stopped and had a rethink. It was off to Halfords next, where I picked up a couple of cans of Audi metallic blue spray paint. The colour looked great on the can, a sort of pleasing mid-blue, and was an improvement, but the finished model still came out a bit too dark:

I was happy with the durability of the sprayed finish, though, and none of the other blue car shades looked any more promising. In order to knock it back to a slightly lighter shade, then, I oversprayed a very dilute mix of silver and thinners. The effect isn't obvious in these shots but you'll just have to trust me that the lightened shade looks much better in certain lights:

The blue is still a little too far into the warm end of the spectrum but it'll have to do. The main thing is that virtually any shade is going to look wrong relative to one or other of the stills, so you just have to go with something that looks right-enough.
It was then onto the decals and detail painting, seen below at an intermediate stage of the work:

Now onto one of the other headaches with the kit. As supplied, it doesn't come with anywhere near enough wheels to model the ship with undercarriage down, which is why it's resting on a film canister in the above shot and tupperware below. In addition, the number 1 wing would need its ends folded down, as per the take-off sequences in the film. Personally, I'd like to model it like that, but that will mean sourcing many, many more suitable wheels, as well as making further modifications to include the missing undercarriage wells. That's something I'd hope to consider in the future, but for now it's modelled in the flight condition we only see very briefly in the film before The Hood's dastardly exploits cause it to crash into the sea!
I've now completed most of the painting and decaling (still a few tiny touch-up jobs to do) so I thought I'd take a few more shots for the sake of this write-up, hopefully showing what a fantastic design Derek Meddings and his modelmakers came up with all those years ago.


I think it fair to say that I've been waiting most of my life to own this model. I'm considerably pleased to have finished the build and be able to admire the sleek lines of this iconic if unwieldy design from any angle I like. As mentioned, there is more that can be done to it, but it'll do for the time being.
Incidentally, how big is meant to be? I don't think there's a conclusive answer. The kit is marketed at 1/600th scale, which would make the Zero X more than 1200 feet long! That's about the size of the Empire State Building tipped on its size. No, way too big, if you go by the sizes of those cars in the production stills. But on the other hand, when TB2 has to come underneath it, it makes TB2 look tiny. My guess is that they had models made to a couple of different sizes but weren't that bothered about strict consistency between different shots and different sequences in the film. However we cut it, though, it's clearly very, very big, and that'll do for me.

